DIY: Granny Square 101
I am so excited to share this with you!!! It's rather lengthy...but don't be frightened it's a lot of repetition. Once you get the hang of it, it will go super fast. I've made the name of each stitch a link to some very easy to understand instructions. Also this website is AMAZING for learning basic stitches and techniques. I use it all the time. So, if you get stumped, click on the stitch you don't understand :-). I'm going to write these instructions in plain english. If you would like to see a real pattern here's a good one.
Here are the only things you need to know:
Okay, here are the supplies you need:
crochet hook (any size your heart desires)
multiple colors of yarn (I used 3, technically you can use just one color...but it's so much fun with more colors.)
Now, that you have everything you need, let's get started. Select your first color of yarn. Step 1 & 2: Chain 6 and join together with a slip stitch.
Round 1
Step 3: Now, we're going to start round 1. Chain 3 (this is going to act like your first double crochet).
Step 4: Now, double crochet twice and chain two.
TIP: Each time you chain 2, you're forming the corner of your granny square. So if you get confused, all of your chain 2's should line up and form and X through the square by the time you're finished.
Step 5: Now, double crochet 3 more and chain 2 again.
We're going to repeat this step 2 more times.
Step 6: When you get to this point, join to the top of your first chain three (remember from pic 3). Cut your yarn and tie it off. Congrats, you've finished round one! Now, choose your second color and let's start round 2.
Round 2
Step 7: Begin by attaching your yarn to any of the four corners. You're going through the entire corner hole, not the stitch.
Step 8: Now, chain 3 (like in round one this will act as your first double crochet - like I said a lot of repetition).
Step 9: Double crochet 2 more times, then chain 2.
Step 10: Now, double crochet 3 more times and chain 1.
Step 11: Okay, double crochet 3 times, chain 2 and double crochet 3 more times. Then chain one.
Alrighty, now we're smooth sailin'. Repeat the sequence that you just did in step 11 two more times.
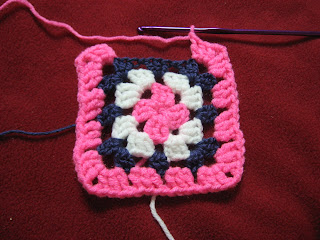
It should look something like this now. To finish round 2, you join to the top of that first chain three. Now, cut your yarn, tie it off, and pick out your next color.
Round 3 begins!
Steps 12 - 15: Attach your 3rd color into any of the chain 2 spaces (remember chain 2 are the corners...so don't start in the middle holes). All in the corner hole, repeat what you did in steps 8-10...like this:
Step 16: After you've finished your first corner of this round, double crochet 3 times in the chain 1 space from round 2 (the middle hole). Then chain 1. Now, do your next corner just like step 11. You're granny square should look something like this:
Okay, now repeat this for the remaining sides.
When you get to your last side, join with a slip stitch to the top of your first chain 3 of this round. You know the drill, cut the yarn, tie it off, pick your next color. YAY! Only one round left. (I only had 3 colors so I went back to my first color, feel free to choose a fourth color.)
Round 4
Step 17: Attach your yarn to any of the four corners. Chain 3, double crochet 2, chain 2, double crochet 3, chain 1. It sounds like a lot but it's just steps 8-10.
In your middle holes (or chain one spaces from the previous round) You will double crochet 3 then chain one. Just like step 16. Repeat this sequence for your remaining sides.
Now, technically you're finished. In theory, you could just keep repeating the process as many times as you like and you would have a HUGE granny square blanket.
I added one more touch to mine. I like to single crochet around the edge of my granny squares to give them a more finished look. (Also, it can help distinguish the shape of your square). All you have to do is single crochet in every stitch. When you get to the corners chain two (because that forms the pointed corners) and keep going.
Weave your ends into the back side of your granny square and TA-DA!
Whew! A pretty finished granny square :-)!!!
Now that you know how to make granny squares, you can help Hello Ladies participate in Warm Up America. We're going to start crafting for a cause. I'm super excited. I'll bring you more details later though because this post is already long enough!
Happy 1st birthday Hello Ladies!!
p.s. Happy 91st birthday to my Gram!
Be crafty lovelies!
-Krackle
Friday, March 12, 2010
|
Labels:
crochet,
DIY,
granny square
|
Subscribe to:
Post Comments (Atom)


1 comments:
That was soooo impressive Krystle! I can't do it, but you made it look so easy! :)
Post a Comment